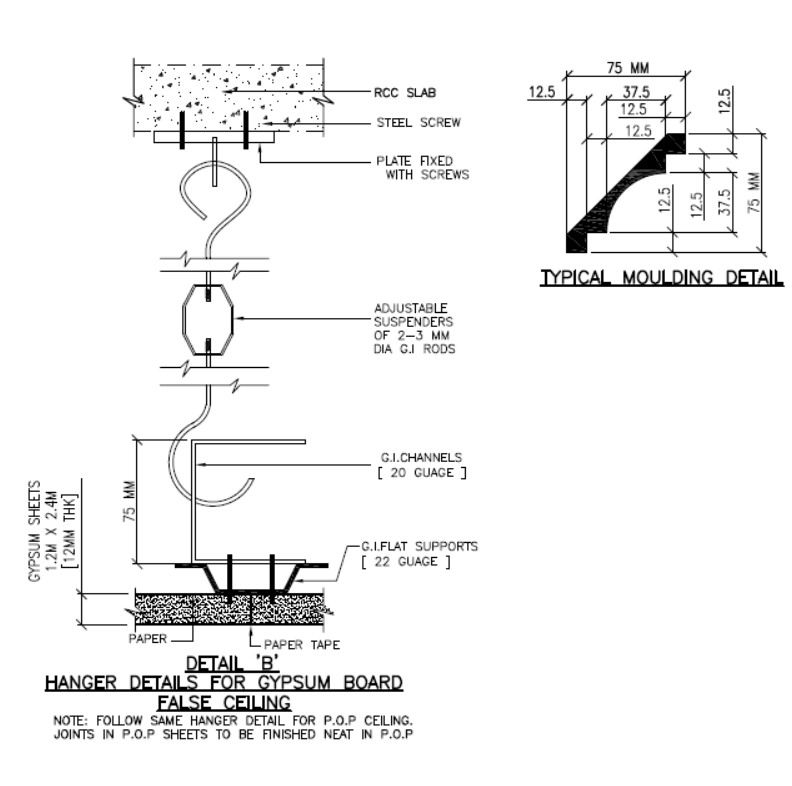
Gypsum board false ceiling installation layout and details
Installing a false ceiling with gypsum board involves a step-by-step process that ensures durability and a professional finish. Here’s how to fix a gypsum board false ceiling:
Step-by-Step Procedure

1. Prepare the Ceiling Area
- Clean the existing ceiling surface to remove dust or debris.
- Mark the required ceiling height using a laser level or chalk line.
2. Install the Framework
- Use GI channels (galvanized iron) for the framework, as they are lightweight and corrosion-resistant.
- Fix the perimeter channel along the marked lines on the wall using screws and wall plugs.
- Install the main ceiling channels perpendicular to the perimeter channels at regular intervals (400 mm to 600 mm spacing, depending on design load and board size).
- Use suspension rods or hangers to support the ceiling channels from the roof slab or wooden framework above.
3. Secure the Gypsum Boards
- Cut the gypsum boards to size using a utility knife or saw.
- Attach the gypsum boards to the GI framework using drywall screws at intervals of 200–300 mm. Use a screw gun to ensure the screws are flush with the board surface.
- Stagger the boards to avoid alignment of edges, reducing cracking potential.

4. Apply Joint Treatment
- Use jointing tape on the seams between the gypsum boards.
- Apply joint compound over the tape to cover gaps and screw heads.
- Allow the compound to dry, then sand the surface to make it smooth.
5. Apply Finishing
- Paint or add desired finishing (such as texture or wallpaper) to the gypsum board.
Materials Needed
- Gypsum boards
- GI framework (channels and hangers)
- Drywall screws
- Jointing tape
- Joint compound
- Tools: Screw gun, drill, measuring tape, saw, utility knife, sandpaper

Tips
- Ensure proper alignment and leveling of the framework to avoid uneven surfaces.
- Maintain a gap (around 10 mm) between the walls and the gypsum boards to allow for thermal expansion.
- Ensure electrical wiring and ductwork are installed before fixing the gypsum boards.

Gypsum bo
- About us
- Blog Post
- Cart
- Checkout
- Contact
- Disclaimer
- Excel Spreadsheets & Drawing Templates to download
- Free Downloads
- Industrial Standards
- My account
- Privacy Policy
- Refund Policies
- Terms and Conditions
- HOUSE PLAN 50 X 50 | SOUTH FACING |
- Electrical Layout For Residential Building
- HOUSE PLAN 29 X 56 | SOUTH FACING |
- Rain Water Gutter and Down Take Systems
- Stormwater Drainage Calculation

- HOUSE PLAN 50 X 50 | SOUTH FACING |

- Electrical Layout For Residential Building

- HOUSE PLAN 29 X 56 | SOUTH FACING |

- Rain Water Gutter and Down Take Systems

- Stormwater Drainage Calculation

Related Posts:

